Monday, 23 September 2013

Sirloin Steak & Asparagus

I don't often treat myself, but when i do, there's nothing i like more than a nice, well cooked steak. Of course, for most people this means going to a restaurant as it's very easy to screw up cooking a steak at home. Fortunately, it's just as easy to cook it right, as long as you follow a few simple rules.

You will need the following ingredients:

2 x Sirloin Steaks, 8oz (225g) each
Bunch of Fresh Asparagus
Garlic Powder
Salt
Parsley

Utensils Needed:

Chefs Knife
Chopping Board
Griddle Pan
Saucepan


In total, this meal costs roughly £3 per person, proving that you don't have to spend a lot, to get a lot.

One of the most important things about cooking any kind of steak, is *never* cook it straight from the fridge. The meat needs to be at room temperature before you start working with it and cooking it. I took really cheap, value steaks, to illustrate just how well even a cheap steak can be turned into a work of art, given the right prep.


Take your griddle pan, and put it on a high heat straight away. This is very important. You want to sear the meat and seal the moisture and fat inside, rather than let it escape into the pan. Put the saucepan on with some water in for the asparagus at the same time, you want it to a rolling boil by the time you've finished the prep. 


Score the fat on the back of each steak. This stops the steak from 'curling up' when you place it face down in the pan. Season them with the garlic powder and parsley at this point. You do *not* need to add any extra fat.

Never add oil to the pan, or the steaks themselves - you end up with a far greasier steak that way, and you only need a small amount to stop the meat from drying out or sticking to the pan.

Set to one side while you deal with the asparagus.


This is the easy bit - all you need to do with the asparagus, is trim about an inch off the bottom of the stalks, removing the thicker, more fibrous parts. The amount pictured, is usually enough for one person.

By now, the griddle pan should be searingly hot (so be very careful!), and the saucepan will be on a nice, rolling boil. Add the asparagus to the pan, and take each steak and with your hands, press the FAT edge into the griddle for roughly 30 seconds. This renders the fat from the steak, crisps up the edge and adds all you need to stop the steak from sticking to even a cast iron griddle.

Once this is done, place each steak seasoned side down, on the griddle pan.

Pay attention to the griddle pan - each steak should take no more than 3 minutes on each side. Only ever turn the steak ONCE. There's no need to poke it, threaten it, interrogate it, or ask it about the fundamentals of life - just 3 minutes per side will do! Flip the steak over, and again, season with salt, garlic powder and parsley just as before.


The asparagus will be ready at the same time the steak will be, so to avoid overcooking it and ending up with a green, amorphous mush, take it off the heat, drain and plate up.

Take the steak off the heat and place on a board to rest. Unfortunately, i no longer have a chopping board with a carving groove around the edges for the juices to collect, so i cheated, by using a wire cake cooling rack, and a plastic chopping board underneath.You should rest the steak for roughly a minute before putting it on a plate, you'd be surprised at the amount of juices that end up coming out of the steak - and you don't want a soggy steak on your plate now, do you? :)


See that below? That is perfectly pink in the middle. If you press it with your finger, it's not too soft and not too hard, with a decent amount of spring left in it. Serve with some wholegrain mustard, or bearnaise sauce. Give yourself a pat on the back, because you just made a perfect steak dinner in less than 15 minutes.


Some of you probably noticed i made no mention of anything potato related - it's purely personal preference. I find a baked potato tends to be too heavy, and you come away from the meal feeling bloated. Mashed potato would be fine, but increases the prep time considerably - but again, if you want to add either, go right ahead, just work out your timings beforehand so you don't end up with either cold steak & asparagus or cold potato!

Saturday, 21 September 2013

Homemade Lamb Burgers

Apologies for the lack of content for over a year - in December 2012 i moved back to the UK from France, and as a result, my kitchen facilities have been lacking until fairly recently. However, to celebrate the resumption of posting, i thought i'd do something that almost everyone loves - BURGERS!

I've made burgers before, from regular old beef mince, but i fancied something different. Lamb seems to be underused these days, probably because it seems to be priced as a 'premium' meat, which is unfortunate, as Lamb tastes amazing.

You will need the following ingredients:

2 x 600g (~21oz) of Lamb Mince (again, you can use beef, pork or turkey mince if you prefer)
2 x Large Shallots - approximately 100g (3.5oz) worth.
3 x Garlic Cloves
1 x Slice White Bread
1 x Egg
Burger Buns
Sliced Cheese
Sliced Beetroot
Bacon (optional)

Utensils Needed:

Chopping Board
Chefs Knife
Large Mixing Bowl
Food Processor or Blender
Baking Sheet
Griddle Pan or Frying Pan

Before i start, a little word about herbs. Depending on the type of meat you're using as a base, you'll want to use a different herb. Obviously if there's something in particular you like, use it - but for those who don't know what goes with what, here's a quick tip; for Lamb use Rosemary, for Beef use Parsley or Coriander Leaf, for Pork use Sage, and for Turkey or any other kind of poultry, use Thyme (feel free to add some lemon juice, too).


 First, peel and chop the shallots and garlic as shown below.


Put them in the frying pan with a little olive oil and a grind of salt. Sweat on a low heat. It's entirely upto you as to whether you caramelise them or not - remember, these will be getting cooked through again.


While the onions & garlic are cooking, take the slice of white bread, and add them to a blender, or food processor. Blitz for a few seconds until you end up with lovely breadcrumbs! Beat the egg, and decant the mince into your mixing bowl.


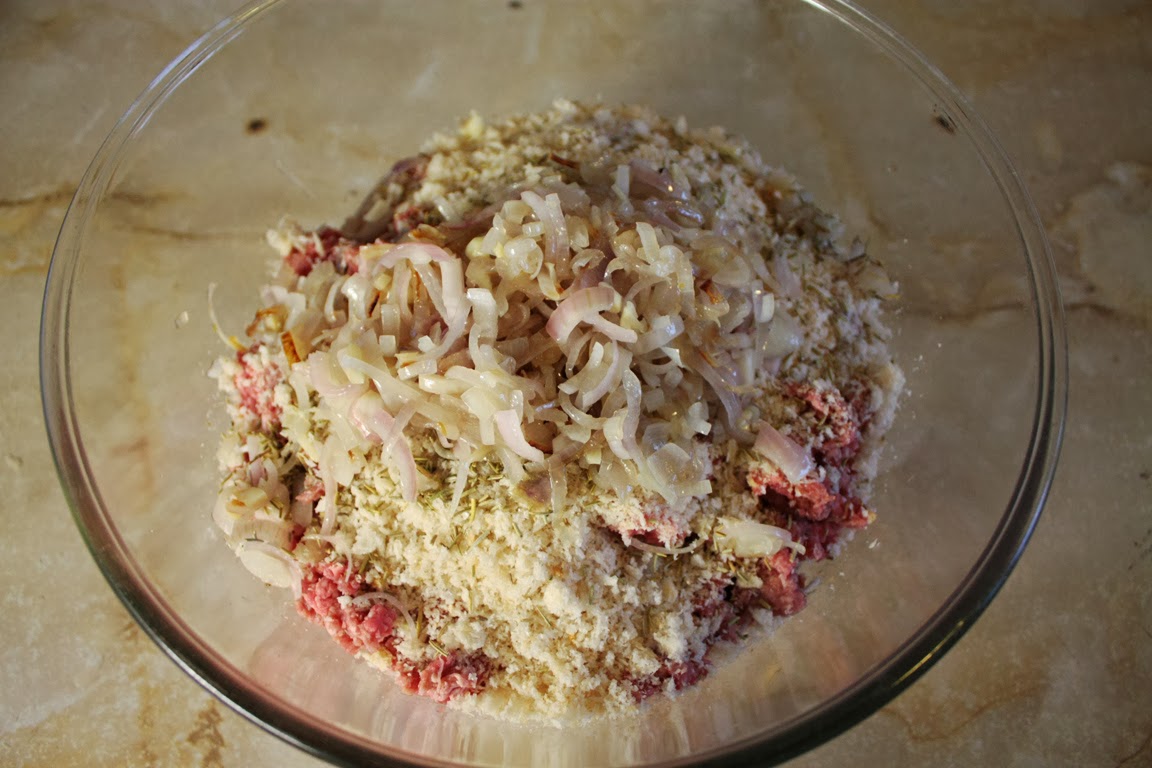
The next bit is stupidly easy, but very, very messy - you need to get stuck in with your hands, so have a bowl of hand washing water on standby! Add the sweated onions, breadcrumbs and beaten egg to the mince in the bowl. Mix thoroughly.


After a few minutes, you should end up with something looking a bit like this:


From here on out, it's simple. Weigh out however much mince you want your burger to weigh, roll into a ball, and form into patties with your hands. Place the finished patties on your baking sheet and place in the fridge for at least an hour.


Then it's a simple matter of cooking them. I prefer to toast each half of the bun for about 30 seconds on each side to stop the bun from disintegrating when you put your hot, juicy burger patty on it. I do this by placing them face down in a DRY frying pan or griddle.

When it comes to cooking the patties themselves, you want as little oil as possible in the pan - lamb can be fatty enough on its own, you don't need to add a lot. For leaner meats, compensate accordingly. The best tip is to cook low and slow. You dont want a raging heat as you'll simply end up charring the outside, while the middle remains raw. For thinner burgers this isn't so much of an issue, but if, like me, you like a nice, thick 8 ounce burger, you'd be wise to check it by taking a skewer and seeing if the juices in the middle run clear.

Remember as well that the burger will continue to cook once you've removed it from the heat, so you can take them off a little earlier than you would normally. It's perfectly fine as well, to cook the burger to medium rare.

Now all you have to do, is plate up - i like to add sliced beetroot and a rasher or two of smoked bacon as an additional topping, but again, all entirely up to you :)

Thursday, 10 May 2012

Steamed Fish Fillets

Now, i meant to post this a long time ago, but things got in the way and other recipes cropped up, and now i'm finally getting round to doing the write up. Plus, I figured i should put something up here that doesn't involve red meat!

You will need the following ingredients:

Scaled, boned fish fillets (Salmon, Trout etc)
Lemon Pepper
Chopped Parsley
Salt
Olive Oil

Utensils needed:

Sheet of aluminium foil
Baking Sheet

This is honestly so simple, not much explanation is required, but here goes...

Preheat your oven to Gas Mark 5 (375° Fahrenheit / 190° Celsius). Take the aluminium foil and pull out a sheet roughly 40cm wide and tear off. Take your fillets of fish and place on the tinfoil. I usually use salmon, in this recipe trout fillets were used. Drizzle just a tiny amount of olive oil over the fillets.


Now take your lemon pepper, and sprinkle over the top. Add the chopped parsley, and a little pinch of salt (not too much).


All that's left, is to wrap it up into a parcel. Fold the edges of the foil inwards, and then seal the edges as shown below. It needs to be tight enough that steam will be trapped, but still have a gap in it so that the steam can escape.


Put in the oven for 15-20 minutes (depends on the size of your oven, but 20 minutes is usually enough). Be careful on opening the parcel, the fish will still be steaming, and you can end up burning your fingertips. To serve the fish, use a fish slice between the skin and the flesh to skin it. The skin will stay behind on the tin foil for easy disposal.

I forgot to take a picture of what it looks like all served up, but luckily i had an earlier picture that shows salmon fillets cooked in the same manner, served alongside mixed mediterranean vegetables - see, i can do healthy too! :D


Monday, 5 March 2012

Classic Beef Bourguignon

So, for my first recipe of 2012, i thought i'd start off with a real sucker punch. It's been too long since i last posted up a recipe, and i'm sorry it's taken so long to get around to it, my culinary mojo has been a little lacking lately!

Beef Bourguignon was a staple of French peasant cuisine in years past, but these days it's become a little high brow and snobbish, served in michelin starred restaurants and expensive bistro's. Sorry, but i'm not having any of it - lets claim this dish back from the world of haute cuisine, it's a good hearty peasant dish! It's the ultimate feel good food, and the perfect dish to serve up on a cold winters day. Give someone a portion of this, and they'll sit savouring every mouthful in silence :)

For those of you that might be thinking it's too hard to make - nonsense. It's a little involved as a recipe, but no more so than any of the others i've posted.

You will need the following ingredients:

1kg of beef - no need to be picky, or use the best cuts!
2 large white onions
1 carrot
1 packet of bacon lardons
5 white mushrooms
2 bay leaves
Clove of Crushed Garlic, or a teaspoon of Garlic Powder
Teaspoon of Dried Thyme
1 bottle of Red Wine - i used the cheapest bottle of burgundy i could find, you're cooking with it, not drinking it!
200ml of beef stock or thin gravy
1 tablespoon of flour
Cooking Oil

Utensils needed:

Casserole Dish with Lid - this has to be large enough to hold the beef and everything else, and STILL have enough room to stop the contents from spilling over in the oven.
Large Saucepan - heavy bottomed if you can get one
Wooden Spoon
Chopping Board
Large Sharp Knife
Three Bowls

As always with oven based recipes, preheat the oven. However, set it to Gas Mark 2 (300° Fahrenheit / 150° Celsius) - we're going for a slow cook, rather than a quick roast. First, chop your beef up into more manageable chunks, about an inch cubed should be fine. Too large, and the meat won't tenderize as well as it otherwise would. Put a little oil into the saucepan, and start to brown the meat. Sprinkle the flour over the top. While it's browning, you want to chop up the onions and the carrot. Once browned, take the meat OUT of the pan, and put it to one side. Put a little more oil back in the saucepan, and add the onions and the bacon, with the garlic & thyme.

Fry the onions & bacon lardons on a low heat until golden brown. At this point, along with the bacon, remove, and set to one side as with the beef. Finally, chop the mushrooms and add these to the pan to cook through. Now you may need to add a little more oil at this point - just make sure the mushrooms are browning properly. Once browned, take out, and put to one side. See the reason for the three bowls now? :)

Now - put the meat back in the pan, along with the bacon, onions & the chopped carrot. Open the wine, and pour it all into the pan, along with the beef stock (or thin gravy, if you used that instead). Add the bay leaves, and put a lid on the saucepan, simmer it for 20 minutes. Stir to stop the contents from sticking to the bottom.

When your timer goes ding, turn the stove off, and decant the contents into your casserole dish. Add the mushrooms at this stage. Put the lid on, and stick it in the oven for at least TWO hours. Yes, it takes time. See, the red wine acts as a tenderizer, and the slow cooking aids the process and enhances the flavour. Three hours would give you the perfect result, but i'm not sure how long most people could resist the fantastic smell from the oven!

After two hours, be VERY careful taking the casserole dish out of the oven - they're both heavy AND blisteringly hot - so take precautions and be mindful of your surroundings. For heavy things like this, i like to make sure i wet my hands a little before i put the oven gloves on, just in case.

Once out, you should be greeted by a glorious sight:


Unfortunately, i didn't take any pictures of the rest of the process, i'm afraid this was my first attempt, and my kitchen was a bit of a mess - nevertheless, it came out PERFECTLY! Perfect side to this is usually pasta, or a baked potato - but feel free to just have it on its own if you prefer, with a big chunk of buttered bread. Before you serve, however, you'll want to remove the bay leaves, they're not very tasty if you bite into one!

Hope you enjoy this, i certainly did :)

Tuesday, 22 November 2011

Perfect Roast Potatoes

Yes, i know, i fail again, posting these two days after the day it was important...but at least next weekend you'll have both recipes to try out! There's no real science to these, and assuming you follow the steps each time, you should have perfectly turned out roasties every time.

You will need the following ingredients:

500g (Roughly 1lb) of Potatoes
Tablespoon of Peanut or Grape Nut Oil
Garlic Powder
Sea Salt

Utensils needed:

Medium Saucepan
Roasting Tin
Colander
Sharp Knife
Chopping Board

As always, preheat the oven before you start. Set it to Gas Mark 5 (375° Fahrenheit / 190° Celsius). Prep your roasting tin first. Pour the oil into the tin, and try and spread the oil to all the corners of the tin. I use peanut or grape nut oil primarily due to it being far healthier than sunflower or rapeseed (canola) oil, as well as having a high flashpoint. Sprinkle a little of the Garlic Powder into the tin, try not to use too much. You can use a crushed or chopped clove of garlic if you prefer, although you stand the risk of getting burnt, roasted bits of garlic on your potato's, so i stick to the powdered - the taste is much the same. Sprinkle a large pinch of sea salt into the pan. Try not to use iodised powdery salt - it's overpowering and easy to use too much of it.

DON'T PEEL YOUR POTATO'S! The skin contains a lot of the potato's nutrients for one, and without the skin, the potatoes won't crisp up as much. However, de-eye them and chop out any bad bits, then chop your potato's into quarters, or however you like them. I recommend smaller chunks for quicker cooking, and easily managed portions.

Place the potatoes into your saucepan, and add another large pinch of salt, then cover over with boiling water. Bring to the boil and simmer for roughly 15 minutes.


This is a process called 'par-boiling', you're breaking down the starches inside the potato, softening them just enough, and also making them moist in the middle. Roasting a potato from raw makes them dry and a little tasteless.

Strain them off with a colander, and decant them into the roasting tin. Due to the loss of moisture when roasting, the potatoes *will* shrink a little, so you can usually fit a few more potatoes in the tin than you might think! Shake the tin so you can the garlic oil all over the potato's as much as possible - the edges of the potatoes will fluff up, don't worry about this, it's exactly what we're after.


All that's left now, is to add them to the oven. Assuming you're doing them alongside the chicken in the recipe below, and started the boiling the potato's at the same time you put the chicken in the oven, the remaining time should be more than sufficient. A little trick to make them extra crispy, is 15 minutes before the oven timer runs out, take the potatoes out of the oven, and using a pallet knife if necessary, flip the potato's around, again re-coating them in the oil, on the sides that haven't been crisped up.

The end result should look like this:


As with all the recipes i upload - i'd love to hear any feedback from you if you try this recipe!

Saturday, 19 November 2011

Perfect Roast Chicken with Cream Gravy

So, it's a weekend, and i love a roast dinner on Sundays more than anything - doesn't matter what, but it always gives me a warm, homely feeling i think everyone is aware of. Problem is...not everyone knows how to roast a chicken properly, and although it's not hard to do, it can be screwed up. Have no fear though, for i shall attempt to walk you through the process of making the perfect roast chicken for a sunday lunch, but be warned, the gravy that goes along with this is hardly the definition of healthy!

You will need the following ingredients:

1 Large Chicken - weight between 1.25 and 1.5kg (2.75 to 3.3lb)
4 Rashers of Rindless Back Bacon
1 Chicken Stock Cube, or one teaspoon of powdered Chicken Stock
1 Dessertspoon of Plain White Flour
Milk

Utensils needed:

Roasting Tin
Carving Board
Carving Fork
Carving Knife
Balloon Whisk
Gravy Boat if you're so inclined.

First, it's imperative that you pre-heat the oven Gas Mark 5 (375° Fahrenheit / 190° Celsius), before you do anything - the oven must be hot before you put the prepared chicken into the oven!

Once pre-heated, it's simple enough to prepare. Now i'm going to be a little bit obvious here, for the benefit of anyone reading that has not done this before. After unwrapping the chicken from it's packaging, check the main cavity to ensure there are NO giblets in there. Most pre-packed ones in France sell them separately, but your local supermarkets or butchers may differ. After you've verified that it's clear, place the chicken in a roasting tin, leaving any string tying it together in place.


Now for the interesting bit. You can quite happily place the chicken in the oven at this point, no-one's going to berate you for doing so - if you like, go right ahead. However, i layer bacon over the top of the chicken at this point. Why? Well, have you ever had a roast chicken, and the meat is a bit on the dry side? Thought so. It comes from there being not enough fat on the breast. 

Bacon cures this problem AND adds that little extra to the flavour of the bird as a whole. See, by using back bacon, with the fat on, as the bacon itself cooks, layered on top of the chicken, the fat is slowly and consistently released into the meat, and the meaty part of the bacon acts like a lid - keeping the moisture IN the meat. 

So, layer the bacon over the chicken as shown below, keeping the line of fat in the same place.


Try and cover the legs too if you can - on this chicken, i used only 4 rashers, but larger ones can use more, but as with all my recipes, you can use as little or as much as you like.

Put it in the oven, using the rule of thumb as 1 hour for every kilo (2.2lb) of weight. As this one was 1.25kg, it was put in the oven for 1 hour and 15 minutes. Now it's in the oven, take your stock cube, and crush it with a pestle and mortar. This isn't needed if you're using ready powdered stock. Mix in with the heaped spoonful of plain white flour and leave to one side.

After the time is up, check the chicken is cooked in the middle by taking the roasting tin out of the oven, and using a carving fork, tip the chicken upright, so that any juices in the cavity run out into the tin. If the juices are clear then the chicken is sufficiently cooked. If the juices are still red with blood, it's NOT cooked through enough, and should be put back in the oven for at least another 15 minutes, before checking again.

If everything checks out however, transfer the chicken from the pan to your carving board, leaving the juices in the tin, like so:


Now, this is where you start having fun! While the chicken is resting on the board, transfer the tin, with the juices still in it, onto the stove. Turn the heat onto low, and in a few seconds the juices should be bubbling away. Take the flour/stock mix, and add to the pan, stirring vigorously with the balloon whisk until you have a thick paste.


Start adding milk slowly whilst whisking, little at a time, as if it were a roux. The trick is to never let the gravy settle, keep it moving to remove any lumps of flour. Keep thinning it out until you're just past the consistency you're after, as once this cools, it will thicken. The end result should look something like this.


At this point, and if you have one, you can decant this into the gravy boat, ready to serve. The end result, along with some of the potato's from the forthcoming recipe, should make an excellent dinner!


See? Dead easy, and just in time for sunday afternoon, too :D

Friday, 18 November 2011

Chilli con Carne

This is a longtime favourite of mine. It's simply moorish, once you have a plateful, you want more. Guaranteed that if you make this, there will be nothing but clean plates and large grins all round! Now, i'm not entirely sure if it's authentic enough to be classed as 'Mexican' food, especially how this is being served, but i'm hoping that after having eaten it - you won't really care! :D

You will need the following ingredients:

600 grams (1.3lb) of Minced Beef (i prefer fresh, frozen seems to lose it's integrity and falls apart too easily!)
Two Large White Onions
One Can of Diced Tomato's
One Can of Kidney Beans or Pinto beans
One Clove of Crushed Garlic or a large spoon of Garlic Granules
Tomato Puree or Passata
Two OXO Cubes
Cayenne Pepper
Paprika
Tabasco Sauce
225grams (8 oz) of Grated Gruyere Cheese (can use Cheddar, or whatever you want, but Gruyere melts nicely)
One Tub of Sour Cream or Creme Fraiche
One Large bag of Tortilla Chips (Cheese flavoured, if you can get them!)

Utensils needed:

Large Saucepan
Wooden Spoon
Large Pyrex Oven Dish or Similar
Sharp Knife
Chopping Board

Now, in case that list was a little on the long side, i laid out all the ingredients for you, so you can visualise it:


First things first - preheat your oven to Gas Mark 4 (350° Fahrenheit / 180° Celsius) - you'll find out why later! Now that's out the way, put a large knob of butter in the saucepan. Chop up both onions, and put in the saucepan with the garlic, and make sure you put the lid on, and turn the heat down to low - we don't want to burn the onions, just sweat them off.  


After about 10 minutes, they should be beautifully soft. At this point you want to add the minced beef, try and break it up into strands - you don't want it to clump together, if you can help it. Turn the heat up, and keep stirring every minute or two to brown the mince. Once the mince has been browned off, add the OXO cubes, crumbling them over evenly, before stirring them in. For Americans, i'm not sure of what you could use as a substitute, but if you have a Publix anywhere nearby, they *may* stock them in the 'World Foods' section, or get some off Amazon.com (yes, that's right, Amazon!). Anyway, after stirring, you should end up with something that looks like this:


Looks similar to the Lasagne recipe from June, right? That's cause up until now, it pretty much is...but here is where the similarities end, and i throw you a curve ball, ha! :P

Take your can of beans, and drain off the liquid, and rinse them in some cold water in a sieve. Add them to the mince, and stir in. Add the can of tomato's. Now add the tomato puree or passata - it's used to thicken the sauce, so just go with what you think looks right. Now comes the important part - spices. This recipe is adaptable, you can use as much, or as little spice, as you like. I like a chilli with a bit of a kick, but not enough to make my eyes water, so i put in 2 heaped teaspoons of paprika, and 2 heaped teaspoons of cayenne pepper, and a large slug of tabasco sauce for good measure. If you have a whole chilli you want to submerge in there, like a naga, or a habanero, go right ahead, but be VERY careful you don't overdo it, otherwise you're liable to...erm...explode! :)

Turn the heat down low once again, and simmer for roughly ten minutes to allow the spices to permeate and the sauce to thicken. End result should resemble this:


Turn the heat off, we're ready for the final phase - the topping. What's that you hear? Topping? On a Chilli?! Yes - trust me on this, it works!

Decant the chilli into your Pyrex dish (i swear the amount of this stuff i use, i should be employed as a spokesman...), and give it a little shake, to get the chilli levelled out, like this:


Open the bag of Tortilla chips, and layer them all over the top, just try not to go overboard...it's always nice to have a handful while you wait, afterall ;)

Take a few heaped spoonfuls of the sour cream or creme fraiche, and dollop it into the middle of the tortilla's - not a very elegant description i know, but run with me on this. You want a reasonably thick layer, that covers almost all of the tortilla's. On top of this, take the grated Gruyere cheese, and sprinkle it alllll over. Use *ALL* of it, don't skimp!


Now put it in the oven for around 5 minutes, until the cheese melts, and starts to bubble - the tips of the tortilla's *may* get toasted, but that's perfectly okay.

Take it out of the oven and admire your handiwork:


Now my serving suggestion would be to take this, and run off to devour it all by yourself, but that's not very professional, or healthy, seeing at it should feed four people easily. Goes well with plain white rice, or a jacket potato...or even just on its own, if you fancy it.

One final thing - if you make it, i'd like you to leave a comment, and tell me how you got on, ok? :)

Sausage Gravy

Yes, this post has been a long time coming - it was supposed to be uploaded at the same time, or near enough, to the southern style biscuit recipe, however, numerous things got in the way and i just plain forgot...until now!

Anyway, thankfully, it's a simple enough recipe, easy to do in a few minutes, assuming you have the ingredients.

You will need the following ingredients:

Sausagemeat (pork or beef will do nicely, just avoid the stuff thats *too* lean)
Heaped Tablespoon of White Flour
Coarse Ground Black Pepper
Knob of Salted Butter
Milk

Utensils needed:

Small Saucepan
Wooden Spoon

Like i said the actual method is easy. Simply put a knob of butter in the saucepan and melt on a low heat. Take the sausagemeat out of the packet and break it up into the pan using your fingers. Brown the sausagemeat for a few minutes.


Add the tablespoon of flour, try and sprinkle it over evenly. I personally add at least 5 large grinds of black pepper, although this isn't mandatory, it gives the gravy it's 'heat', so really, you can use as much or as little as you like.


Stir through thoroughly, making sure there are no clumps of flour. Turn the heat down to low, and pour in the milk, little at a time, stirring throughout, ensuring you get the correct consistency, and no lumps in the gravy. Technically, this is a variant on a roux (as in the tunafish pie recipe).

After about 3 minutes of adding milk and stirring, you should end up with the finished product.


Now make yourself some biscuits to go along with this, and enjoy yourself! :)

Wednesday, 28 September 2011

Slow Cooked Pork & Egg Fried Rice

This is ridiculously easy & cheap to make, and it beats any MSG laced stuff you can get from your local chinese takeaway! It's moorish, tasty, and feeds upto three people.

You will need the following ingredients:

Barbecue Sauce (from December's recipe, just don't blend it, use it straight from the pan)
1kg of belly pork in strips (you can substitute this with any other meat though, or add to it with chicken/beef etc)
1 sachet of Boil in the Bag Rice (it's easier to use, and less hassle, but use 1½ cups of regular rice if you prefer)
1 egg
Tablespoon of cooking oil
Pinch of Parsley
Pinch of Salt

Utensils needed:

Large Pyrex Dish or Casserole Dish
Frying Pan
Medium Saucepan
Sheet of Foil

Preheat the oven to Gas Mark 4 (350° Fahrenheit / 180° Celsius). Take your pork (or whatever other meat you're using), and cut it up into small chunks, cubes, whatever you like really. Put into your pyrex/casserole dish, and cover with the unblended BBQ sauce. Stir through to make sure everything is evenly covered. Cover with the tinfoil, and put into the oven for at least 40 minutes.

15 minutes before the pork is due to come out, put your sachet of rice in to boil, adding the pinch of salt to the water. Once it's finished, drain off the water. Heat up the frying pan, add the oil, and then the rice. Sprinkle the parsley over the rice, and mix through to make sure it's evenly spread out. While the rice is frying, crack in your egg, and mix through the rice vigorously for at least a minute to ensure the egg is fully cooked.

By now, the pork should have finished cooking, so all that's left to do, is serve it & enjoy :)

Tunafish Pie

Fish is a sorely underused thing in the kitchen these days. However, it's very easy to get it wrong, and i've heard from more than one person about their bad experiences with it. Yes, it doesn't always appeal to everyone, but even those people that rarely like fish, will usually eat tuna, either in a pasta salad, or with mayonnaise in a sandwich. It is for precisely this reason that to try and ease people into eating more fish, the concept of the tunafish pie was created. It's simple to do, can be made quickly, with little to no lead time, and with only a simple set of ingredients. It can be refrigerated as well, for upto 2 days, making it the perfect student food! :D

You will need the following ingredients:

One Can of Tuna in Brine (Oil can be used, but tends to produce a greasy end-product)
115 grams (4oz) of Plain White Flour (for the pastry)
28 grams (1oz) of Plain White Flour (for the sauce)
58 grams (2oz) of Salted Butter (for the pastry)
58 grams (2oz) of Salted Butter (for the sauce)
1 cup of Semi-Skimmed Milk
58 grams (2oz) of Cheddar Cheese or other similarly hard cheese (your choice)
Pinch of Salt

Utensils needed:

One Pie Dish (8" diameter)
Small Saucepan
Chopping Board
Rolling Pin

Preheat the oven to Gas Mark 4 (350° Fahrenheit / 180° Celsius). First, you need to create a simple shortcrust pastry dough. This needs to be done before anything else, as once made, it needs to cool in a fridge before you roll it out. A simple rule of thumb is half fat to flour, with just enough water to bind. Too much water will cause the dough to be too thick, and end up heavy and thick, instead of thin and crisp.

Take your measured flour and butter for the pastry, and add to a food processor with the pinch of salt. Yes, you *can* do it in a bowl by hand but honestly, you should get a food processor to just make life easier in the kitchen! Blend it until you get to the crumb stage.


Once at this stage, turn the food processor back on, and while it's moving, *slowly* trickle cold water into the mix. You may need to stop the processor to make sure no flour gets left behind, but you only want *just* enough water to turn it into a dough ball. You should end up with something like this:


It's not a complete, contiguous dough ball, but you can roll this into one by hand. Empty the contents of the mixer into a bowl (i used the one on the scales), and roll into a single ball. 


Place in the fridge. Next, you want to flour the chopping board, so just take a loose few pinches of flour and sprinkle over the board and the rolling pin.


Next, you want to create the pie filling. Take your butter and flour for the sauce, and add to the saucepan.


Melt the butter and flour together until you have a paste. If it looks too thin, add a little more flour, teaspoon at a time (roux's aren't an exact science!). 


Once at the paste stage, you want to add milk, a little at a time, stirring constantly, until all the milk has been added. You should end up with a smooth, creamy sauce base, that looks something like this:


Now, this is a simple, basic sauce base, you can use this technique to make any kind of white, or cheese sauce, for any recipe at all. For our purposes of course, we're going to turn this into a cheese sauce, so add the grated cheese at this stage, and stir through until it's melted. The sauce will thicken at this stage. If you were to leave it as a cheese sauce you could thin it out with a little more milk if you preferred, but we want this to be thick, as we're going for a pie filling, after all! Open the tuna, drain off the brine (or oil, if you're using that), and add to the sauce. Stir well over the heat, but after about a minute, take it off the heat altogether, the filling is done. 

By this point, the pastry has been chilling nicely in the fridge. Not too much to turn it into a rock, but enough to make it roll nicely. Warm pastry tends not to bind very well, and gets stuck to the rolling pin. Take the dough ball, place it on the floured board, and begin rolling it flat. You want it about about 2mm thick all round. Too thin, and it'll lose it's form, too thick and you'll end up with doughy, chewy pastry.


Once rolled out, you should be encompassing almost the entire surface of the board. Take your pie tin, and grease it with a little butter on some kitchen paper, or some oil, and then sprinkle some flour into the tin, and move round the loose flour until the bottom & sides are covered as best as you can. Now comes the tricky part. You need to lift the pastry up, and hold it sort of 'draped' with one hand, as you move the tin over to the board, before lowering the pastry back down into the tin. Make sure the pastry fills all the space in the tin, poked into the corners properly. don't worry about any overlaps around the edges, it's fine - same goes for any spare pastry overhanging the side.


At this point, you can choose to add the filling OR you can do what i prefer to do with pastry cases, and blind bake it. By this, i mean you cook the pastry until the shell is hard, but not cooked all the way through. This stops the pastry from becoming too 'damp & soggy' on the bottom. It's not a dark art, like some make it out to be, it's actually pretty simple.

Trim the excess pastry from the sides with a knife, but try and leave a little overhang if you can, as when cooked, the pastry will contract slightly. Prick the base with a fork repeatedly, but prick only, don't stab it all the way through. This has the effect of preventing any air bubbles from forming. 


Take a sheet of greaseproof or wax paper cut to size, and place it in the bottom - if using wax paper, put the PAPER side down, rather than the wax side. I didn't have either, so i used the butter paper from earlier. Then, you want to use cooking beads, or dried beans/peas to weight the paper down. Again, i had to improvise here, and used Ford Zetec valve adjustment shims...they were sufficiently heavy and covered enough area :)


Put this into the oven for around 10 minutes, until the pastry has hardened. As mentioned, the pastry will have contracted. 


Finally, all you have to do now, is take the filling from the saucepan, and decant it into the case, three quarters of the way up the sides at most (you don't want to overfill it). Any excess filling can be used with the leftover pastry, make yourself a little snack parcel after you've finished cooking the pie :)


Finally, bake in the oven for approximately 20 minutes. When you take it out, leave the pie to settle and cool for around 10 minutes before serving. 


Some boiled potato's, or just a salad, is a good accompaniment - enjoy!