Sunday, 27 July 2014

Tutorial - How to remove the skin from Tomatoes

There are often times in recipes that call for peeled tomatoes, and i have a few myself ready to put up. It might sound pretty daunting, but actually it's pretty simple, you just have to pay attention to the timing. It's best to do them in large batches due to the fact it can seem like a bit of a chore.

You will need the following ingredients:

7 large vine tomatoes (you can use any tomato, but the smaller, the fiddlier!)

Utensils Needed:

Chopping Board
Chef's Knife
Large Saucepan
Large Bowl
Slotted Serving Spoon
As much Ice as you can get hold of


First off - 3/4 fill a large saucepan with water and get it upto a nice, rolling boil.


Check the tomatoes are firm - soft tomatoes will fall apart, so make sure they're as fresh as possible.


Score the tomatoes with a large 'X' on the underside with your knife. Try not to score the flesh too much if you can help it.


Now, this part is time critical and can be fiddly. Use the slotted spoon to put all of the tomatoes into the saucepan of boiling water, and count down 60 seconds. NO MORE THAN 60 SECONDS! Smaller tomatoes will need less time but never exceed 60 seconds regardless of the size of tomato.


Take the tomatoes out of the boiling water and plunge them straight into ice water. The colder the better. It stops the tomatoes from cooking, and makes it easier to remove the skin.

Leave them in the water for at least 5 minutes before peeling them. Start at the 'X' mark and the skin should come away with ease. The tomato will feel a little soft & slippery, so return it to the water to rinse off.

You should be left with a bowl of lovely skinned tomatoes, as shown below.

Saturday, 28 June 2014

Tzatziki

Okay, so this isn't exactly a meal, it's an accompaniment to many other sorts of food, typically mediterranean and middle eastern, but this goes well, i think, with the tandoori chicken recipe i posted a few weeks ago, particularly as it can use up the 250g of yoghurt that goes unused!

You will need the following ingredients:

Whole Cucumber
A Lemon
250g of Greek Yoghurt
Salt & Pepper
Garlic Paste
Olive Oil

Utensils Needed:

Large Ceramic Bowl
Chef's Knife
Peeler


First of all, take the cucumber and peel it. Yes, that's right, peel it. You don't need a lot of pressure on the peeler to remove the skin either. Once peeled, slice lengthways and scoop out the pulp/seeds with a teaspoon. slicing a 'V' groove here with the knife aids in seem removal. This is done to stop it from becoming too watery. You want to be left with the cucumber looking as it does below:


 Then, simply dice the cucumber into fairly sizeable chunks.


At this point, add the juice of half the lemon, a good grind of black pepper and a large pinch of salt (don't overdo the salt, though). Add a good heaped teaspoon of garlic paste (or crushed garlic if you prefer) and mix through thoroughly.


Mix in the 250g of yoghurt at this point. Make sure it's well mixed as possible.


Ta-da! Done. See? Pretty simple for a side dish, takes about 10 minutes to prepare. The recipe will scale as well, so if you do double the cucumber - double the yoghurt. It will keep in the fridge for a day, two at a push, so try not to make too much of it in one go.


Wednesday, 4 June 2014

Tandoori Chicken

If you like indian food, you may be familiar with tandoori chicken already. Contrary to popular belief, it's not at all difficult to make and doesn't need a lot of ingredients, either. This is perfect for summertime BBQ, served with salad or rice.

You will need the following ingredients:

1kg of Chicken Breast Fillets
250g of Natural Yoghurt
1tbsp of Tandoori Spice Mix
A Lemon
Salt

Utensils Needed:

Chef's Knife 
Plastic Chopping Board
Ceramic or Pyrex Dish
Grill Pan


Take the chicken breasts, and trim the fat & skin off them. score the top of  chicken about 1/3rd of the way down. If the breasts are more than about an inch thick, split them through the middle so they cook properly on the grill.


Once all the breasts are prepared, transfer them to a dish, ready to marinate. Juice the lemon and pout the lemon juice over the breasts. Grind a decent amount of salt over the top and set to one side whilst you prepare the marinade itself.


If you're using a 500g tub of yoghurt like i am here, decant half of it into a bowl and set the rest to one side. Take the tablespoon of tandoori spice and mix it into the yoghurt well.


See how the chicken breasts are going white? That's the proteins in the chicken denaturing - this makes the chicken tender and soft, and stops it from drying out under the grill.


Time to get your hands messy! Pour the yoghurt & spice over the chicken, and mix it through the chicken with your hands. Might be a good idea to have a tap running beforehand! Yes, i know you could use a fork or a spoon, but it takes longer and you never quite get the mix evenly spread out. At this point you should put it in the fridge for at least an hour, but even overnight, if you want to prepare this in advance.


If, like me, you're relegated to using an oven, or have no proper grill pan for the oven, you can use this trick - get a roasting tin and line it with tin foil. Suspend a wire cake rack over the top and ta-da, instant grill! Of course i'd rather use a proper BBQ or griddle for this, but i have to make do...


Spread the chicken over the grill, don't pack them in too tightly so that the edges get cooked through as well.


As for cooking, this will depend entirely on your grill/oven/bbq. Basically, you want the chicken to get to where it looks charred on one side, before you turn it over, so you'll need to keep an eye on it. As mentioned, it'll need to be cooked on both sides. If you need to add a little more of the marinade to the other side, there should be some left in the dish they marinated in.


Once off the grill, take the thickest piece and slice it diagonally to ensure it's cooked all the way through. It should be white all the way through the middle with NO pinkness. If there is any, put it back on the grill and grill for a further minute.


As you can see from this bit, it's all done nicely. Take them all off the grill and slice into large chunks, ready to serve. I serve mine typically with some boiled basmati rice for a simple, healthy dinner.


Sunday, 1 June 2014

Sausage & Lentil Casserole

I realise this is considered a dish for cold seasons, but it's taken me a while to find the SD card with the pictures on it! Yes, it's yet another one pot deal, what can i say - i like any excuse to break out my casserole dish!

It's entirely concocted of whatever was left in the store cupboards and the back of the fridge, and should easily feed three people. It's hearty, warming and packed full of flavour.

You will need the following ingredients:

1 large Brown or White Onion (any will do though, in a pinch)
2 Carrots
3 large Garlic Cloves
Pack of 8 Sausages, cooked & cold
200g of Mushrooms
100g of Unsmoked Back Bacon trimmed of fat.
1 can of Green Lentils in Water
2 Chicken stock cubes
Sage (Fresh or Dried)

Utensils Needed:

Chef's Knife
Chopping Board
Casserole Pot with Lid (Cast iron & Enamel are ideal)
Wooden Spoon
Measuring Jug


As with the Goulash below, the preparation for this is pretty simple. It's a one pot stew that takes maybe an hour, to an hour and a half to make. Pre-heat your oven to Gas Mark 2 (300° Fahrenheit / 150° Celsius) - we're going for a slow cook again.

Chop the garlic cloves up as fine as you can and leave to one side. Chop up the onion as coarse or as fine as you like, same with the carrots (although i find that thick chunks work best).

Put about a tablespoon of olive oil into the casserole dish and place on the smallest ring on the stove, at it's highest heat. Get it nice and hot, then add the garlic. Just as the garlic starts to brown, add the onions and turn the heat down low and put the lid on for about 5 minutes. The end result should look like this:


Now add the carrots and the sage. the amount of sage used is entirely up to you, feel free to leave it out entirely if you wish.


Trim the fat off the bacon if you haven't already, and cut into thin strips or chunks. We don't want to ruin this otherwise fairly lean dish by having chewy/fatty bits of bacon floating around in it!

Put the lid on for a minute, just to start the process - we don't want the bacon to fry off. 


Take the cooked sausages and add them at this point. Now i've chopped them into chunks here, so that they're easier to deal with on a spoon, but if you want to bring a fork to these proceedings, by all means feel free to add them whole.

Open the can of lentils and drain off the water. Rinse them with a little cold water first to get rid of some of the salt, then add them to the casserole dish as well.


Put the lid on and go and mix up 300ml of chicken stock, using your two stock cubes. I find that beef stock is a little too overpowering and takes over the taste almost entirely - which is fine if you're using beef sausages, but i'm presuming most people will use pork sausages.

Chop your mushrooms roughly, large chunks are ideal - don't do more than quarter them, they *will* shrink as they cook.

Now, add both to the casserole dish and put the lid on for about 5 minutes to get the whole lot up to the boil again.


Take the casserole dish off the stove, and put it in the oven. Rough guideline for cooking time is 30 to 40 minutes, anything more than an hour though, and the liquid will reduce too much and you'll start to get bits stuck to the bottom of the pan.


Ta-da! I know, it looks like an amorphous brown mess like that....so stick it in a bowl, and it'll look far more appetizing!


Serve with some nice thick sliced granary bread. I guarantee you'll feel full after eating even one bowlful :)

Tuesday, 4 February 2014

Hungarian Goulash

So many times in the last few months, i've meant to post up several recipes, but either through a failure in taking photographs for the step-by-step, or consistently forgetting the writeup, i've not managed it. Thankfully though, as the inaugural post of 2014, i bring you one of my new favourite winter warmers - Hungarian Goulash. It's quite rich and will definitely clear your sinuses, but it's ridiculously filling, just on it's own.


You will need the following ingredients:

1 kg (2.2lb) of Diced Pork, Beef, Lamb or Chicken - use whatever you prefer.
1 large Brown or White onion
3 large Mixed Bell Peppers
4 large Garlic Cloves
1 can of Cannellini Beans
1 can of Chopped Tomatoes (optional)
300 ml (11 fl. oz) of Sour Cream
5 tablespoons of Paprika
1/2 tablespoon of Caraway Seeds
3 OXO cubes
Tomato Puree
Olive Oil
Bottle of Red Wine (cheap is ideal - i use the £3.99 Aldi stuff)

Utensils Needed:

Chef's Knife
Chopping Board
Casserole Pot with Lid (Cast iron & Enamel are ideal)
Wooden Spoon


Honestly, the prep for this is pretty simple. It's a one pot stew that takes maybe an hour, to an hour and a half to make, depending on the meat you're using. Pre-heat your oven to Gas Mark 2 (300° Fahrenheit / 150° Celsius) - we're going for a slow cook again.

Chop the garlic cloves up as fine as you can and leave to one side. Chop up the onion as coarse or as fine as you like, same with the peppers (although i find that thick chunks work best).

Put about a tablespoon of olive oil into the casserole dish and place on the smallest ring on the stove, at it's highest heat. Get it nice and hot, then add the garlic. Just as the garlic starts to brown, add the onions and turn the heat down low and put the lid on for about 5 minutes. The end result should look like this:


At this point, add all the peppers and the caraway seeds. Now, caraway seeds can be quite pungent, but don't be afraid to experiment with the amounts as the taste will mellow out the longer the goulash cooks. Sweat the peppers for around 5 to 10 minutes.


Once sweated, you can add the meat. If you prefer you can brown the meat off in a little oil in a separate pan first, if you prefer, however i just find it easier to add all of it to the vegetables and mix it through. Once added & mixed, again, put the lid back on for about 10 minutes.


Add the cannellini beans at this point. If you wish, you can also add canned chopped tomatoes as well, but it's not essential - on this occasion, i left them out...because i forgot. Oops!


 Put the lid back on and mix up 300ml of beef stock using the OXO cubes. Add 300ml of red wine to the stock and add it to the casserole pan. Add the paprika at this point, with about a tablespoon of tomato puree. It may seem like an excessive amount of paprika, but it'll all disappear quickly enough, and despite appearances, it won't be too overpowering. You can mix in smoked paprika as well if you like, but keep to around 5 tablespoons of paprika overall.


Make sure the tomato puree is well mixed in, it will, along with the paprika, ensure you're left with a nice, thickened broth.


Put the lid back on, leave for 10 more minutes before transferring it to your pre-heated oven. As mentioned, the cooking time overall will vary from 40 minutes to an hour and a half. Chicken and pork will only need around 40 minutes, beef & lamb will need at least an hour and a half to ensure the meat is nice & tender.

Once done however, you should end up with something that looks a bit like this:


Despite the loss of a fair bit of liquid, the stew should be thick and hearty, but for the finishing touch, and to be authentic - add the sour cream and stir well.


Ta-da! You're all done. Serving suggestions for this range from rice, to boiled/mashed potatoes, however i find that the stew is enough by itself, and needs little more than a buttered bread roll on the side of it.


Even with decent portion sizes, you should be easily able to feed four people with this - and feel them well.

Monday, 23 September 2013

Sirloin Steak & Asparagus

I don't often treat myself, but when i do, there's nothing i like more than a nice, well cooked steak. Of course, for most people this means going to a restaurant as it's very easy to screw up cooking a steak at home. Fortunately, it's just as easy to cook it right, as long as you follow a few simple rules.

You will need the following ingredients:

2 x Sirloin Steaks, 8oz (225g) each
Bunch of Fresh Asparagus
Garlic Powder
Salt
Parsley

Utensils Needed:

Chefs Knife
Chopping Board
Griddle Pan
Saucepan


In total, this meal costs roughly £3 per person, proving that you don't have to spend a lot, to get a lot.

One of the most important things about cooking any kind of steak, is *never* cook it straight from the fridge. The meat needs to be at room temperature before you start working with it and cooking it. I took really cheap, value steaks, to illustrate just how well even a cheap steak can be turned into a work of art, given the right prep.


Take your griddle pan, and put it on a high heat straight away. This is very important. You want to sear the meat and seal the moisture and fat inside, rather than let it escape into the pan. Put the saucepan on with some water in for the asparagus at the same time, you want it to a rolling boil by the time you've finished the prep. 


Score the fat on the back of each steak. This stops the steak from 'curling up' when you place it face down in the pan. Season them with the garlic powder and parsley at this point. You do *not* need to add any extra fat.

Never add oil to the pan, or the steaks themselves - you end up with a far greasier steak that way, and you only need a small amount to stop the meat from drying out or sticking to the pan.

Set to one side while you deal with the asparagus.


This is the easy bit - all you need to do with the asparagus, is trim about an inch off the bottom of the stalks, removing the thicker, more fibrous parts. The amount pictured, is usually enough for one person.

By now, the griddle pan should be searingly hot (so be very careful!), and the saucepan will be on a nice, rolling boil. Add the asparagus to the pan, and take each steak and with your hands, press the FAT edge into the griddle for roughly 30 seconds. This renders the fat from the steak, crisps up the edge and adds all you need to stop the steak from sticking to even a cast iron griddle.

Once this is done, place each steak seasoned side down, on the griddle pan.

Pay attention to the griddle pan - each steak should take no more than 3 minutes on each side. Only ever turn the steak ONCE. There's no need to poke it, threaten it, interrogate it, or ask it about the fundamentals of life - just 3 minutes per side will do! Flip the steak over, and again, season with salt, garlic powder and parsley just as before.


The asparagus will be ready at the same time the steak will be, so to avoid overcooking it and ending up with a green, amorphous mush, take it off the heat, drain and plate up.

Take the steak off the heat and place on a board to rest. Unfortunately, i no longer have a chopping board with a carving groove around the edges for the juices to collect, so i cheated, by using a wire cake cooling rack, and a plastic chopping board underneath.You should rest the steak for roughly a minute before putting it on a plate, you'd be surprised at the amount of juices that end up coming out of the steak - and you don't want a soggy steak on your plate now, do you? :)


See that below? That is perfectly pink in the middle. If you press it with your finger, it's not too soft and not too hard, with a decent amount of spring left in it. Serve with some wholegrain mustard, or bearnaise sauce. Give yourself a pat on the back, because you just made a perfect steak dinner in less than 15 minutes.


Some of you probably noticed i made no mention of anything potato related - it's purely personal preference. I find a baked potato tends to be too heavy, and you come away from the meal feeling bloated. Mashed potato would be fine, but increases the prep time considerably - but again, if you want to add either, go right ahead, just work out your timings beforehand so you don't end up with either cold steak & asparagus or cold potato!

Saturday, 21 September 2013

Homemade Lamb Burgers

Apologies for the lack of content for over a year - in December 2012 i moved back to the UK from France, and as a result, my kitchen facilities have been lacking until fairly recently. However, to celebrate the resumption of posting, i thought i'd do something that almost everyone loves - BURGERS!

I've made burgers before, from regular old beef mince, but i fancied something different. Lamb seems to be underused these days, probably because it seems to be priced as a 'premium' meat, which is unfortunate, as Lamb tastes amazing.

You will need the following ingredients:

2 x 600g (~21oz) of Lamb Mince (again, you can use beef, pork or turkey mince if you prefer)
2 x Large Shallots - approximately 100g (3.5oz) worth.
3 x Garlic Cloves
1 x Slice White Bread
1 x Egg
Burger Buns
Sliced Cheese
Sliced Beetroot
Bacon (optional)

Utensils Needed:

Chopping Board
Chefs Knife
Large Mixing Bowl
Food Processor or Blender
Baking Sheet
Griddle Pan or Frying Pan

Before i start, a little word about herbs. Depending on the type of meat you're using as a base, you'll want to use a different herb. Obviously if there's something in particular you like, use it - but for those who don't know what goes with what, here's a quick tip; for Lamb use Rosemary, for Beef use Parsley or Coriander Leaf, for Pork use Sage, and for Turkey or any other kind of poultry, use Thyme (feel free to add some lemon juice, too).


 First, peel and chop the shallots and garlic as shown below.


Put them in the frying pan with a little olive oil and a grind of salt. Sweat on a low heat. It's entirely upto you as to whether you caramelise them or not - remember, these will be getting cooked through again.


While the onions & garlic are cooking, take the slice of white bread, and add them to a blender, or food processor. Blitz for a few seconds until you end up with lovely breadcrumbs! Beat the egg, and decant the mince into your mixing bowl.


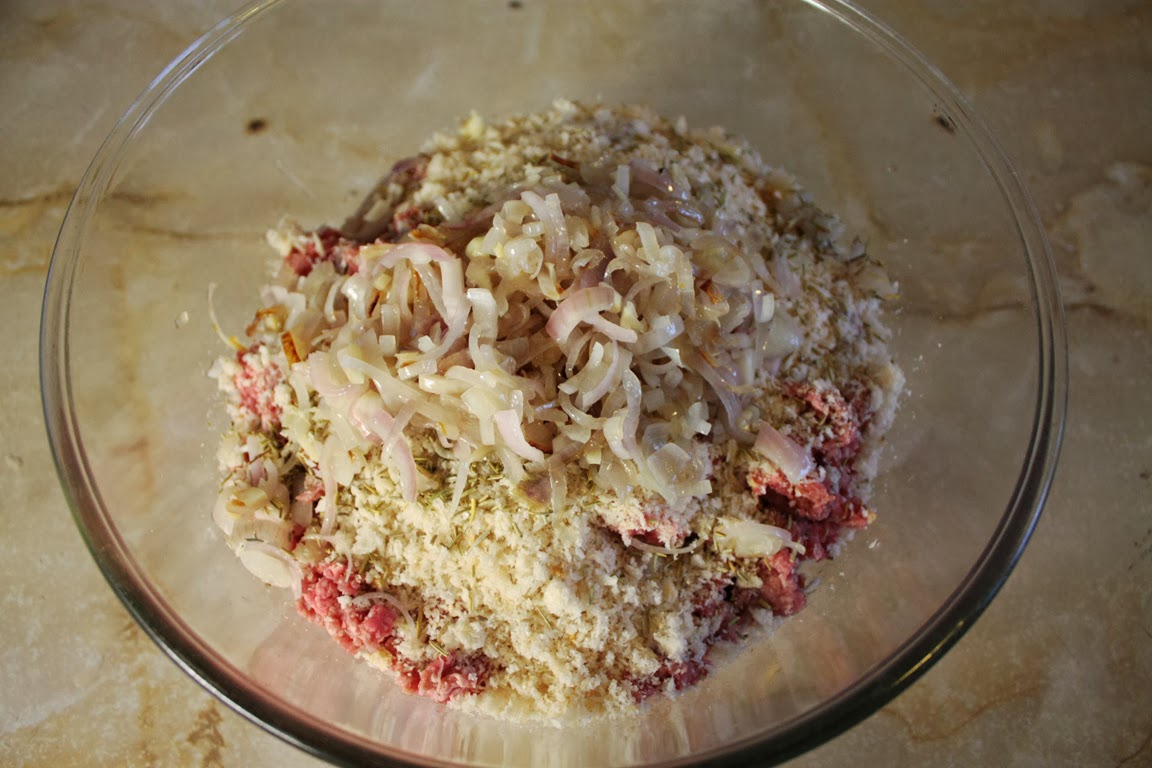
The next bit is stupidly easy, but very, very messy - you need to get stuck in with your hands, so have a bowl of hand washing water on standby! Add the sweated onions, breadcrumbs and beaten egg to the mince in the bowl. Mix thoroughly.


After a few minutes, you should end up with something looking a bit like this:


From here on out, it's simple. Weigh out however much mince you want your burger to weigh, roll into a ball, and form into patties with your hands. Place the finished patties on your baking sheet and place in the fridge for at least an hour.


Then it's a simple matter of cooking them. I prefer to toast each half of the bun for about 30 seconds on each side to stop the bun from disintegrating when you put your hot, juicy burger patty on it. I do this by placing them face down in a DRY frying pan or griddle.

When it comes to cooking the patties themselves, you want as little oil as possible in the pan - lamb can be fatty enough on its own, you don't need to add a lot. For leaner meats, compensate accordingly. The best tip is to cook low and slow. You dont want a raging heat as you'll simply end up charring the outside, while the middle remains raw. For thinner burgers this isn't so much of an issue, but if, like me, you like a nice, thick 8 ounce burger, you'd be wise to check it by taking a skewer and seeing if the juices in the middle run clear.

Remember as well that the burger will continue to cook once you've removed it from the heat, so you can take them off a little earlier than you would normally. It's perfectly fine as well, to cook the burger to medium rare.

Now all you have to do, is plate up - i like to add sliced beetroot and a rasher or two of smoked bacon as an additional topping, but again, all entirely up to you :)